
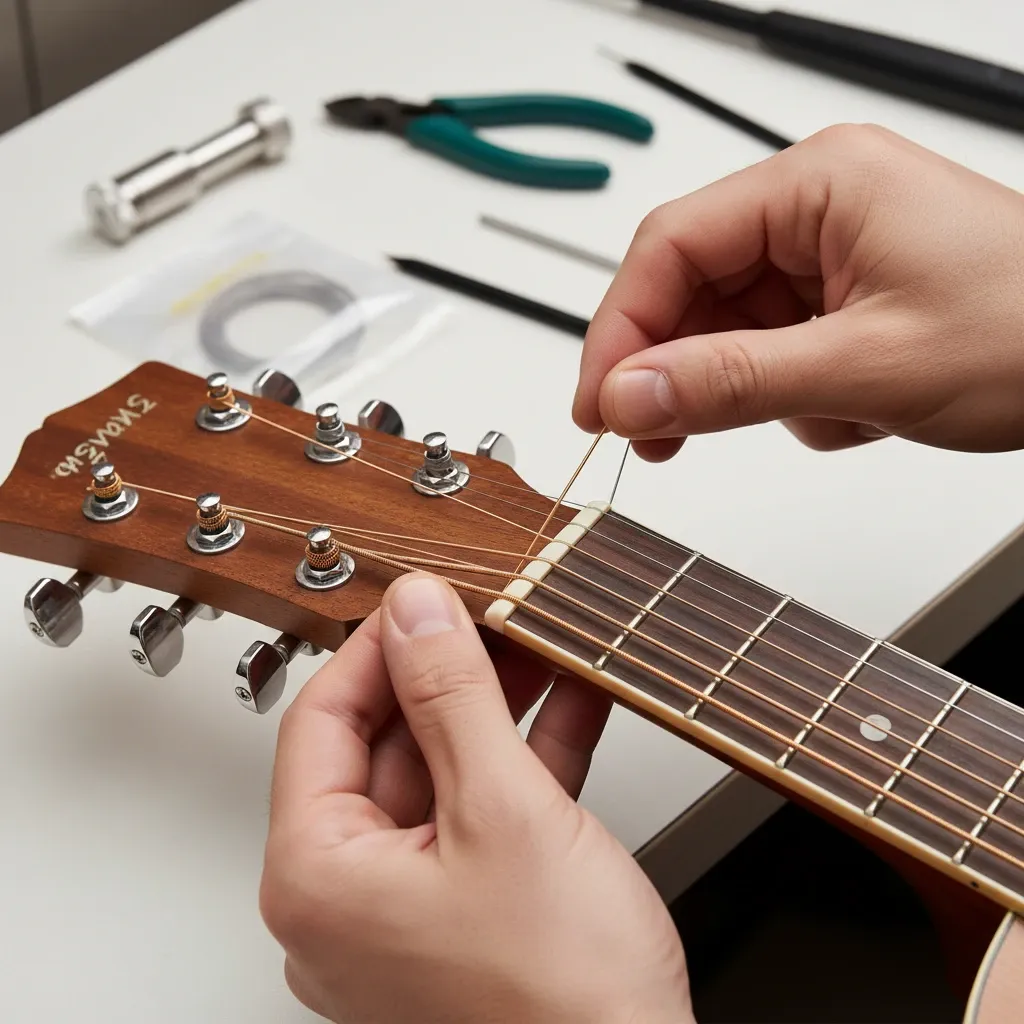
Why Fresh Strings Change Everything
Every guitarist remembers the first time they put a new set on an old instrument. The dull, plinky tone disappears, chords ring out with sparkle, and the guitar suddenly feels like it wants to be played. Strings are the cheapest upgrade you can make, and learning to change them yourself saves money, time and the awkward wait at a repair counter.
The job looks fiddly at first, but it is really a repeatable routine. Once you have done it two or three times, a full set takes about fifteen minutes. This guide walks through the whole process in the order I use in my own workshop routine, with the small details that separate a neat string change from one that slips out of tune all evening.
A quick historical note helps explain why the steps below matter. Steel strings only became standard on flat-top guitars in the early twentieth century, when makers began bracing tops to survive far higher tension than gut ever produced. You can read more about that evolution in this overview of the steel-string acoustic guitar. That tension is exactly why careful, even restringing is good for your instrument.
Signs It Is Time to Restring
There is no universal calendar date, but your ears and fingers give clear hints. Look and listen for these signals:
- Dull or muted tone. Highs vanish and chords sound flat even when perfectly in tune.
- Poor intonation. Open chords sound fine, but chords higher up the neck drift sharp or flat.
- Discoloration or rough texture. Wound strings turn dark, gritty or gummy where your fingers rest.
- Constant tuning trouble. The guitar will not hold pitch, particularly the G and B strings.
- Visible kinks or rust. Any fraying or corrosion means the string will break soon.
As a rough guide, someone playing an hour a day will want fresh strings every four to eight weeks. Occasional players can stretch that to three months, though strings also age sitting on a guitar because of humidity and skin oils. Players with acidic sweat sometimes need changes every two weeks, and coated strings can last several times longer than plain ones.
Tools and Materials You Need
You can restring with nothing but a set of strings, but a few inexpensive tools make the job faster and safer for the guitar.
- A new set of strings in the right type and gauge for your guitar.
- String winder. A small plastic crank that turns the tuning pegs about four times faster than your fingers.
- Wire cutters or snips. Nail clippers do not cut it. Steel strings will damage them.
- Bridge pin puller (often built into the winder). Prying pins with a fingernail or a spoon is a classic way to chip a bridge.
- Clip-on tuner or any reliable tuning device.
- Soft cotton cloth for wiping the strings, fretboard and body.
- Optional extras: fretboard conditioner, a soft pencil with graphite, and a towel or neck rest to support the instrument.
Choosing the Right Strings
Before you open the pack, make sure the set matches your guitar. Steel strings are for steel-string acoustics, while nylon strings belong on classical guitars. Mixing them up can seriously damage a classical instrument, which is built for much lower tension.
Within steel-string sets, gauge is your main decision. Gauge is measured in thousandths of an inch, starting with the thinnest string:
- Extra light (10-47): easy on the fingers, quieter, good for beginners and fingerstyle players with small-bodied guitars.
- Custom light (11-52): a happy middle ground between comfort and volume.
- Light (12-53): the most common choice; balanced tone and projection.
- Medium (13-56): louder and fuller, but harder to fret and tougher on older guitars.
Material matters too. Bronze strings (80/20) sound bright and crisp. Phosphor bronze is warmer and tends to last longer. Coated strings resist corrosion and keep their sparkle for weeks. If your guitar is vintage or has a lightly built top, check what the maker recommends before moving to heavier gauges.
Prepare Your Workspace and the Guitar
Lay a towel on a table or rest the guitar flat on your lap with the body supported. The neck should be stable, because the headstock is easy to knock when you are leaning in to wind a peg. Keep the new strings in their packets until you need each one, which prevents tangles and keeps the oil on your fingers from reaching them early.
Check the packet envelopes. Most are color-coded or numbered by string. The sixth string is the thickest, low E. The first string is the thinnest, high E. Mixing up the order is a classic beginner slip, and the numbering takes the guesswork out.
Change One at a Time or Remove Them All?
Both methods are valid, and which one you choose depends on what you want to accomplish.
Changing one string at a time keeps tension on the neck fairly constant. The new string takes the place of the old one, and the guitar settles faster. It also helps beginners remember which tuner goes with which string.
Removing all strings at once gives you open access to the fretboard for a deep clean and a good look at the frets. It is the better option when you want to condition the wood or inspect the bridge and nut. Do not leave the guitar without strings for days at a time, though. Most acoustics have an adjustable truss rod, and a long stretch with no string tension can allow the neck to move slightly.
For this tutorial I describe a full change, since it covers every step. If you prefer the one-at-a-time method, simply repeat the removal and installation steps for each string.
Step 1: Loosen and Remove the Old Strings
Start by turning each tuning peg to slacken the strings until they flop loose. A winder speeds this up considerably. Unwinding from the tuner is easier than cutting the strings under tension, and it avoids a sudden snap that could scratch the finish or hit your face.
Once the strings are slack, you have two options. You can unwind each one completely from the post, or you can cut the string around the twelfth fret. Cutting makes removal quick, and it splits the string into two manageable pieces. Always cut only after the tension is gone.
Then deal with the bridge end. Acoustic guitars hold strings with small pegs, called bridge pins, pushed into holes in the bridge. Each string ends in a small ball, which sits underneath the bridge plate inside the guitar. To release a string:
- Place the notch of your pin puller under the lip of the bridge pin.
- Lift gently, using the tool as a lever. If the pin is stuck, wiggle it slightly rather than yanking it.
- Pull the string out through the bridge hole.
Put the pins in a small dish, because they love to roll off a table and disappear. If a pin sticks fast, do not force it with pliers. Slip the string upward a bit so the ball unseats first, then try again with the puller.
Step 2: Clean the Guitar While It Is Bare
A stringless guitar is a gift. You can reach areas that are impossible to clean when everything is in the way, and ten minutes of care here pays off for years.
- Fretboard: wipe away grime with a slightly damp cloth, then dry it well. For unfinished rosewood or ebony, apply a very small amount of fretboard conditioner or lemon oil, let it sit briefly, and wipe off the excess. Skip heavy oils on maple boards, which usually have a protective finish.
- Frets: polish gently with a dry cloth, taking care to follow the length of each fret.
- Body and neck: use a clean microfiber cloth to remove fingerprints and dust. Avoid household sprays, since they can cloud a nitrocellulose finish.
- Hardware: wipe the tuners and bridge. If a tuner feels stiff, a tiny drop of machine oil on the gear can help, but keep it away from the wood.
This is also a good moment to inspect the nut and saddle for wear. Sharp edges or deep grooves can pinch strings and cause pinging noises or breakage. A bit of graphite from a soft pencil rubbed into the nut slots keeps the strings gliding smoothly while you tune.
Step 3: Install the Bass Strings First
Many players work from the sixth string toward the first, and this order works well because it keeps your hands out of the way of strings already installed. Whatever sequence you choose, repeat the same careful motions for each string.
Seat the Ball End in the Bridge
- Take the string and gently bend the last half inch near the ball. This small kink helps the ball stay in place later.
- Insert the ball end into the correct bridge hole.
- Push the bridge pin back into the hole, with the carved groove facing the saddle, the slim bone or plastic strip toward the soundhole. The string should sit in that groove.
- Pull up on the string gently until the ball seats tightly against the bridge plate. You will often hear or feel a faint click as the pin locks into position.
A common mistake is leaving the pin slightly raised, which happens when the ball rides on top of the pin instead of against the bridge plate. If a pin pops out as you tune, this is nearly always the reason. Pull the string up while pressing the pin down to fix it.
Thread the String Through the Tuner
Pull the string along the neck toward the headstock and pass it through the hole in the tuning post. Pick the right post: the sixth string goes to the lowest tuner on the bass side, then the fifth and fourth follow upward. The treble side runs from the third string near the nut to the first string at the top.
Set the slack before you wind. Pull the string tight, then back off to create about two inches (five centimeters) of play, or roughly the distance to the next tuning peg. Too much slack gives you sloppy wraps, and too little leaves too few wraps to hold the pitch.
Step 4: Wind the Strings Properly
This is the part that determines tuning stability. A string wound neatly, with a few clean wraps, will hold pitch far better than a messy tangle.
Direction of Winding
On a standard guitar with three tuners per side, the bass-side pegs (E, A, D) tighten by turning counterclockwise when you look at the guitar from the front. The treble-side pegs (G, B, E) tighten clockwise. If the string loosens when you turn, you are going the wrong way. On a six-in-line headstock, all tuners turn the same direction.
Number of Wraps
- Wound bass strings (E, A, D): two to three wraps are plenty. They are thick and grip well.
- Plain treble strings (G, B, high E): three to four wraps help because thin, smooth strings tend to slip.
Too many wraps make tuning harder and can lead to a string that slips as the coils pile up. Aim for wraps that descend neatly down the post, with the first wrap crossing over the string end. Each new coil should sit below the previous one rather than on top.
The Locking Technique
A simple trick locks the string in place without special hardware. After pulling the string through the post hole and into position:
- Bend the loose end back and away from the direction you will be winding.
- Start winding so the first wrap goes over the string end and the next goes under it.
- Keep gentle tension on the string with your free hand while you crank the tuner.
The wrap pinches the end, making a self-locking hold. It costs you nothing and it reduces slipping. Once the string is approximately at pitch, snip the extra with your wire cutters, leaving about half an inch. Cut closer than that and you risk the string unraveling. Leave too long and you will poke yourself.
Step 5: Bring Each String Up to Pitch
Set the string into its nut slot while you tune. If it sits proud of the slot or in the wrong one, nudge it with your finger. Bring the pitch up slowly. Standard tuning from the thickest string to the thinnest is E, A, D, G, B, E.
Use a clip-on tuner on the headstock, or any trusted tuning reference. Always tune up to a note rather than down. If you overshoot, drop below the pitch and approach again from underneath, which keeps the gear tight and reduces slack in the mechanism.
For a deeper look at how the instrument developed and how strings behave under tension, the Britannica entry on the guitar offers a helpful backgrounder.
Step 6: Stretch the Strings
New strings are springy. They keep stretching for the first hour or so, which is why a freshly restrung guitar seems to go flat every few minutes. You can speed up the settling process with a gentle stretch:
- Tune the guitar to pitch.
- Hook a finger under a string near the twelfth fret and pull it up about an inch away from the fretboard. Do it carefully, not violently.
- Slide your hand up and down the string length, repeating the lift in several spots.
- Retune. Repeat the process until the pitch no longer drops.
Three or four rounds are typically enough. Do not overdo it, because yanking too hard can kink the string or even snap it. Think of it as coaxing rather than wrestling.
Step 7: Final Checks and Fine-Tuning
With everything in tune, run through a quick checklist:
- Bridge pins: are they seated evenly, with the grooves facing the saddle?
- String ends: trimmed and tidy, with no sharp wires sticking out?
- Nut slots: do the strings sit freely, without buzzing or pinging?
- Tuning stability: play a few chords, then recheck the tuner.
- Cleanliness: wipe fingerprints from the body and neck.
If the guitar buzzes at the lower frets after a gauge change, the neck relief may need a small adjustment, and that is a job for a technician unless you are comfortable with a truss rod wrench. A new gauge changes tension, so a guitar that sounded perfect with lights may need a tweak after you move to mediums.
Common Mistakes and How to Avoid Them
Winding in the Wrong Direction
If the tuner turns but the pitch drops, reverse course. Check which side of the headstock you are on before cranking.
Using Too Much Slack
Excess slack creates a bulky coil on the post that slides as you tune. The result is a string that wanders out of pitch. Stick with the two-inch rule.
Ignoring Bridge Pin Alignment
An incorrectly seated pin is the top cause of a pin that pops out. Always check that the ball end is firmly against the bridge plate and the groove faces forward.
Forcing a Stuck Pin
Pliers can crush a pin and scar the bridge. Use the proper puller, and remember that patience is cheaper than a repair.
Cutting Strings Under Tension
A sudden snap can scratch the top or injure your eyes. Loosen first, then cut.
Putting the Wrong Strings on a Classical Guitar
Steel strings can bend the neck and lift the bridge of a classical guitar. If your instrument has wide flat nylon-style tuning machines and a tie-block bridge, it needs nylon strings and a different installation method.
Pros and Cons of Doing It Yourself
Is it worth learning to restring on your own? For most players the answer is yes, but here is a balanced view.
- Pros: you save money over time, you can change strings right before a gig or recording, you learn how your guitar is built, and you spot developing issues early.
- Cons: mistakes can occur at first, such as a pin popping out or a string slipping. A valuable vintage guitar may deserve a professional’s touch, and complex issues like worn nuts or neck adjustments are best left to a luthier.
For a standard flat-top in good condition, the DIY route is safe and satisfying.
Habits That Make Strings Last Longer
Strings are consumables, but you can slow down their decline with a few simple habits.
- Wash your hands before playing. Natural oils and dirt are the main enemies of string life.
- Wipe the strings after each session. A dry cotton cloth run along the length of each string removes moisture and sweat.
- Store the guitar in its case or a stable, moderately humid room. Rapid changes in humidity cause both string corrosion and wood movement.
- Consider coated strings if you play often or live in a damp climate.
- Keep spares. A broken string rarely happens at a convenient time, so have a spare set in the case.
A Short Story From the Bench
A few years ago, a friend brought me an acoustic that she insisted was “broken.” It would not stay in tune, the chords sounded hollow, and she was ready to blame the tuners. I removed the old set, which looked more like rusty fishing line than guitar strings. Underneath, the fretboard was coated in a gray film and one bridge pin sat half a centimeter proud of the hole.
I cleaned the wood, reseated the pin, and installed a fresh set with neat wraps and a proper stretch. When she strummed the first chord, she laughed out loud. Nothing was wrong with the guitar. It simply needed a new set of strings and a bit of attention. That experience taught me to start every troubleshooting session with the cheapest fix before blaming the hardware.
Quick Reference: The Restringing Routine
- Gather your tools and the right set of strings.
- Loosen the old strings fully and remove them with a winder and bridge pin puller.
- Clean the fretboard, body and hardware while the guitar is bare.
- Insert each ball end, seat the pin with the groove forward, and pull the string up to lock it.
- Feed the string through the tuning post with about two inches of slack.
- Wind two to three wraps on bass strings, three to four on treble strings, in the correct direction.
- Tune up to pitch, then stretch the strings gently and retune.
- Trim the excess, check the nut slots, and give the guitar a final wipe.
Follow that routine a few times and it becomes second nature. Soon you will be restringing while chatting with friends or watching a game, and your guitar will reward you with the clear, lively tone it had the day it left the shop.



Deixe um comentário